The world of web design, programming, and specially gatsbyjs has been moving at an astonishing pace. If you have been following me here, you would know, I am all for new, and cleaner looks.
Note that since moving to 11ty, many of the codes and features described in this post will be broken. Please refer to my archived github repo for any old code.
I firmly believe in keeping myself up to date with latest trends so that I do not start lagging behind. With this philosophy, I have been following gatsby themes for some time now. Gatsby themes along with mdx, theme-ui and styled components, make up an ultimate JAM stack to build websites and blogs.
- Using novela as a starting point to start using gatsby themes, theme-ui and styled components.
- Several other modifications: tags, math rendering via katex, Table of Contents, Image Gallery, Scroll to top, next/previous posts, title of code blocks etc.
- gatsby cloud for fatster build and deployment.
- Find all the modifications at my github repo
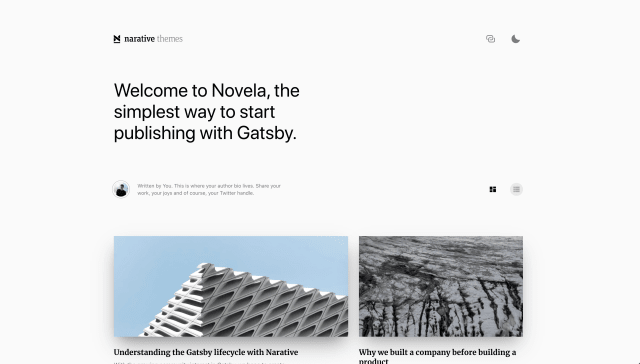
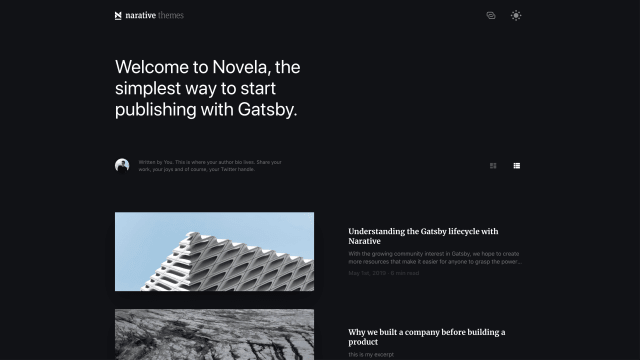
Till now, I have been using an adhoc design based on one developed by Tania Rascia. Making any changes to it was little cumbersome, including tracking down every css code across many files. When searching for right gatsby theme for my blog, I came across a great theme: Novela! It has a lot of cool features that I just loved it: light/dark theme, awesome prism support, a very modern look, Medium features like image zoom, highlight to share etc. And the best part, It uses all the tools I have been interested in - mdx, theme-ui, and styled components!
The novela theme still lacked a lot of features that I needed. Some of the major lacking features were lack of tags, support of rendering math properly. I have been following their github repo quite closely since last few months. Although few pull requests have been added to the repo, the development has been extremely slow. No one ever reviews the pull requests in time. Some PRs have been pending for months. After a few months of wait, I gave upon them, and finally decided to take matters on my own.
This post is about all the steps I have taken to modify this theme to personalize it. I will mainly focus on development of some of the main features. You can find all of my changes at this blog’s gihub repo.
TagsSection titled Tags
After cloning the master branch of the Novela repo, I merged the local branch from the PR repo.
I found this PR to be quite complete. Only change I had to make was to the CSS of the TagBox. I
ended up adding some additional colors in theme-ui color definitions to support these.
...
const TagBox = styled.div`
  display: flow-root;
  height: 24px;
  line-height: 24px;
  position: relative;
  margin: 0 4px 4px 0;
  padding: 0 10px 0 12px;
  background-color: ${(p) => p.theme.colors.tagBackground};
  -webkit-border-bottom-right-radius: 3px;
  border-bottom-right-radius: 3px;
  -webkit-border-top-right-radius: 3px;
  border-top-right-radius: 3px;
  -webkit-box-shadow: 0 1px 2px rgba(0, 0, 0, 0.2);
  box-shadow: 0 1px 2px rgba(0, 0, 0, 0.2);
  color: ${(p) => p.theme.colors.tagText};
  font-size: 12px;
  font-family: 'Lucida Grande', 'Lucida Sans Unicode', Verdana, sans-serif;
  text-decoration: none;
  text-overflow: ellipsis;
  text-shadow: 0 1px 2px rgba(0, 0, 0, 0.2);
  overflow: hidden;
  font-weight: bold;
  white-space: nowrap;
`;
...Rendering Math via katexSection titled Rendering Math via katex
Once again, I used a pending PR and merged its local branch to mine.
One major update, I had to make was to ensure that the document variable is utilized only at run
time, not at the build time. In all the files where katex-display class is modified via the
global document variable, I had to add the conditional check of document not being undefined.
(See the highlighted line in the codeblock.)
if (typeof document !== `undefined`) {
  Array.from(document.getElementsByClassName("katex-display")).forEach(
    element => {
      element.style.color = isDark ? "white" : "black";
    }
  );
}Draft PostsSection titled Draft Posts
When writing new posts, many a times I like to check-in new posts to git that are still in
development. However, I like them to be rendered during the development, but not in the production
build. A post can be flagged as “draft” either explicitly via a frontmatter field called draft or
by using a date of post in the future.
I enabled this by first enabling the draft field in the frontmatter by adding it to the
@narative/gatsby-theme-novela/src/gatsby/data/data.query.js
Then, in @narative/gatsby-theme-novela/src/gatsby/node/onCreateNode.js, I added code to create
new field for it (See the highlighted code below).
  ...
  const moment = require('moment-timezone');
  require('dotenv');
  ...

  if (node.internal.type === `Mdx` && source === contentPath) {
      const getDraftValue = ({ node, options }) => {
        const { fieldName, timezone } = options;
        if (!node.frontmatter) {
          return false;
        }

        if (node.frontmatter.hasOwnProperty(fieldName)) {
          return node.frontmatter[fieldName];
        }

        if (!node.frontmatter.date) {
          return false;
        }

        const dateNode = moment.tz(node.frontmatter.date, timezone);
        const dateNow = moment().tz(timezone);
        const value = dateNow.isSameOrBefore(dateNode);

        return value;
      };

      const options = {
        fieldName: 'draft',
        timezone: 'UTC',
        force: process.env.NODE_ENV === 'development', // if developmet, force to be NOT draft
      };

+    const fieldData = {
+      author: node.frontmatter.author,
+      date: node.frontmatter.date,
+      hero: node.frontmatter.hero,
+      secret: node.frontmatter.secret || false,
+      draft: options.force === true ? false : getDraftValue({ node, options }),
...Finally, in @narative/gatsby-theme-novela/src/gatsby/node/createPages.js file, filter articles
to the ones that are not drafts before creating pages.
...
const articlesThatArentDraft = articles.filter((article) => !article.draft);
const articlesThatArentSecret = articlesThatArentDraft.filter((article) => !article.secret);
...Related PostsSection titled Related Posts
Novela theme by default has a very simple way to show one or two (depending on the scr related posts below a given post. I wanted to update its logic such that posts with most matching tags and the ones with the least difference in post times from the current post get higher weight. The second rule ensures that posts around same dates are found to be more related than only the more recent ones.
This involved only a little bit of javascript update in
@narative/gatsby-theme-novela/src/gatsby/node/createPages.js.
...
let OtherArticlesThatArentSecretSorted = articlesThatArentSecret
    .filter((art) => art !== article)
    .sort((a, b) => {
        const allTags = article.tags.map((t) => t.trim().toLowerCase());
        const allATags = a.tags.map((t) => t.trim().toLowerCase());
        const allBTags = b.tags.map((t) => t.trim().toLowerCase());
        let intersectionA = allATags.filter((x) => allTags.includes(x));
        let intersectionB = allBTags.filter((x) => allTags.includes(x));

        let num_days_A = diff_days(
            new Date(a.dateForSEO),
            new Date(article.dateForSEO),
        );
        let num_days_B = diff_days(
            new Date(b.dateForSEO),
            new Date(article.dateForSEO),
        );

        return (
            intersectionB.length - intersectionA.length || num_days_A - num_days_B
        );
    }
);

let next = OtherArticlesThatArentSecretSorted.slice(0, 2);
if (next.length === 0)
    next = articlesThatArentSecret.slice(index + 1, index + 3);

if (next.length === 1 && OtherArticlesThatArentSecretSorted.length !== 2)
    next = [
    ...next,
    OtherArticlesThatArentSecretSorted.filter((art) => art !== next[0])[0],
    ];

// If it's the last item in the list, there will be no articles. So grab the first 2
if (next.length === 0) next = articlesThatArentSecret.slice(0, 2);
// If there's 1 item in the list, grab the first article
if (next.length === 1 && articlesThatArentSecret.length !== 2)
    next = [...next, articlesThatArentSecret[0]];
if (articlesThatArentSecret.length === 1) next = [];
...Notice that at the end, I have kept the old logic of picking last two posts as related posts as a backup.
Table of Contents (TOC)Section titled Table of Contents (TOC)
For longer posts, its helps to add a Table of Contents at the top for easy navigation. MDX provides
automatic list of headings along with its depth to help with creating Table of Contents.
In the novela theme, I had to update the MDX component and the article template to achieve this. In the MDX component, I had to pass the headings parameter to the MDXRenderer.
<MDXProvider components={components}>
  <CustomBlockCSS>
    <MDXBody>
      <MDXRenderer headings={headings} isDark={colorMode === "dark"} {...props}>
        {content}
      </MDXRenderer>
      {children}
    </MDXBody>
  </CustomBlockCSS>
</MDXProvider>Then in the article template, add additional graphql query to extract headings data from the
current post. Here, I use title of the post to filter the current post.
/* eslint no-undef: "off" */
export const pageQuery = graphql`
  query BlogPostBySlug($title: String!) {
    posts: mdx(frontmatter: { title: { eq: $title } }) {
      frontmatter {
        title
      }
      headings {
        depth
        value
      }
    }
    site: allSite {
      edges {
        node {
          siteMetadata {
            name
          }
        }
      }
    }
  }
`;Additionally, I also had to develop a TOC component that could be called directly from the mdx files. This also required to add this component to the known list of components in MDX.
You can find my detailed implementation at my repo.
I also used a package called react-anchor-link-smooth-scroll for creating smooth scroll to all
links with the post. You can find a working example at this post.
Scroll Up ButtonSection titled Scroll Up Button
For longer posts, it also helps to have scroll to Top button at the bottom right of the page. This
is pretty starightword by using a package called react-scroll-up-button. I just had to add a
small section in Layout component.
Notice use of some extra CSS to disable scroll up button on small screens.
Links to Next/Previous PostsSection titled Links to Next/Previous Posts
I like to have links to the next and the previous posts on every regular posts. Creating this was
as simple as adding context for these links in createPages.js gatsby node scripts.
let nextPage;
if (index === 0) {
  nextPage = null;
} else {
  idx = index - 1;
  temp = articlesThatArentDraft[idx];
  while (temp.secret) {
    idx = idx - 1;
    if (idx === -1) {
      temp = null;
      break;
    }
    temp = articlesThatArentDraft[idx];
  }
  nextPage = temp;
}

//  prev article
let prevPage;
if (index === articlesThatArentDraft.length - 1) {
  prevPage = null;
} else {
  idx = index + 1;
  temp = articlesThatArentDraft[idx];
  while (temp.secret) {
    idx = idx + 1;
    if (idx === articlesThatArentDraft.length) {
      temp = null;
      break;
    }
    temp = articlesThatArentDraft[idx];
  }
  prevPage = temp;
}Notice use of while loops to skip over any secret posts. Also, I had to explicitly disable those in the article template:
{
  !article.secret && (
    <PaginationWrapper>
      <PaginationButton>
        {prevPage && !prevPage.secret && (
          <Link className="previous" to={`${prevPage.slug}`} aria-label="Prev">
            ❮❮ Previous
          </Link>
        )}
      </PaginationButton>

      <PaginationButton>
        {nextPage && !nextPage.secret && (
          <Link className="next" to={`${nextPage.slug}`} aria-label="Next">
            Next ❯❯
          </Link>
        )}
      </PaginationButton>
    </PaginationWrapper>
  );
}Additionally, the CSS for buttons etc. was provided by the definitions of PaginationWrapper and
PaginationButton styled components.
Custom Components like tldr, update etc.Section titled Custom Components like tldr, update etc.
gatsby-remark-custom-blocks is a plugin that adds custom blocks to markdown contents in gatsby. These custom blocks allow one to use markdown within the block, by defining custom classes and blocks. I like using these especially for TLDR and Update blocks. You can an example right at the top of this post.
To enable this, at first I had to enable this plugin in gatsby-config.js file.
...
gatsbyRemarkPlugins: [
  {
    resolve: 'gatsby-remark-custom-blocks',
    options: {
      blocks: {
        tldr: {
          classes: 'tldr',
          title: 'optional',
        },
        update: {
          classes: 'update',
          title: 'optional',
        },
      },
    },
  },
...Then, I had to define my CSS for tldr and update classes in the MDX component.
Custom Pages: 404, Code Stats, About Me etc.Section titled Custom Pages: 404, Code Stats, About Me etc.
This part was pretty starightword. For About Me and resume, I have used the concept of secret
posts. You can mark a post as secret simply by including a frontmatter flag of secret: True. For
custom 404 page and codestats, I create two pages files in reckoning/src/pages/ with
corresponding names, 404.js and codestats.js.
gatsby cloudSection titled gatsby cloud
As my blog has grown, the build time has become larger and larger. At the current stage, If I build my site on netlify, it takes more than 10 minutes!
Then I discovered gatsby cloud! This sites’ build time now is between 3-4 minutes! Thats some improvement. And setting up and linking it with github and netlify is super simple, just follow the official guide.
So that’s it folks! A lot of changes to the codebase, but I learnt/discovered a lot of things. I plan to add additional features to this theme, keep following this space if you are interested. And as always, feel free to take a look at my code base, clone it, play with it and even put some pull requests if you find some mistakes or improvements!
COMMENTS